
AI Video Storyboard Prompts: Shot-by-Shot Guide
Turn one idea into a coherent AI video with a practical storyboard prompt system for shot roles, continuity, camera motion, timing, and review.
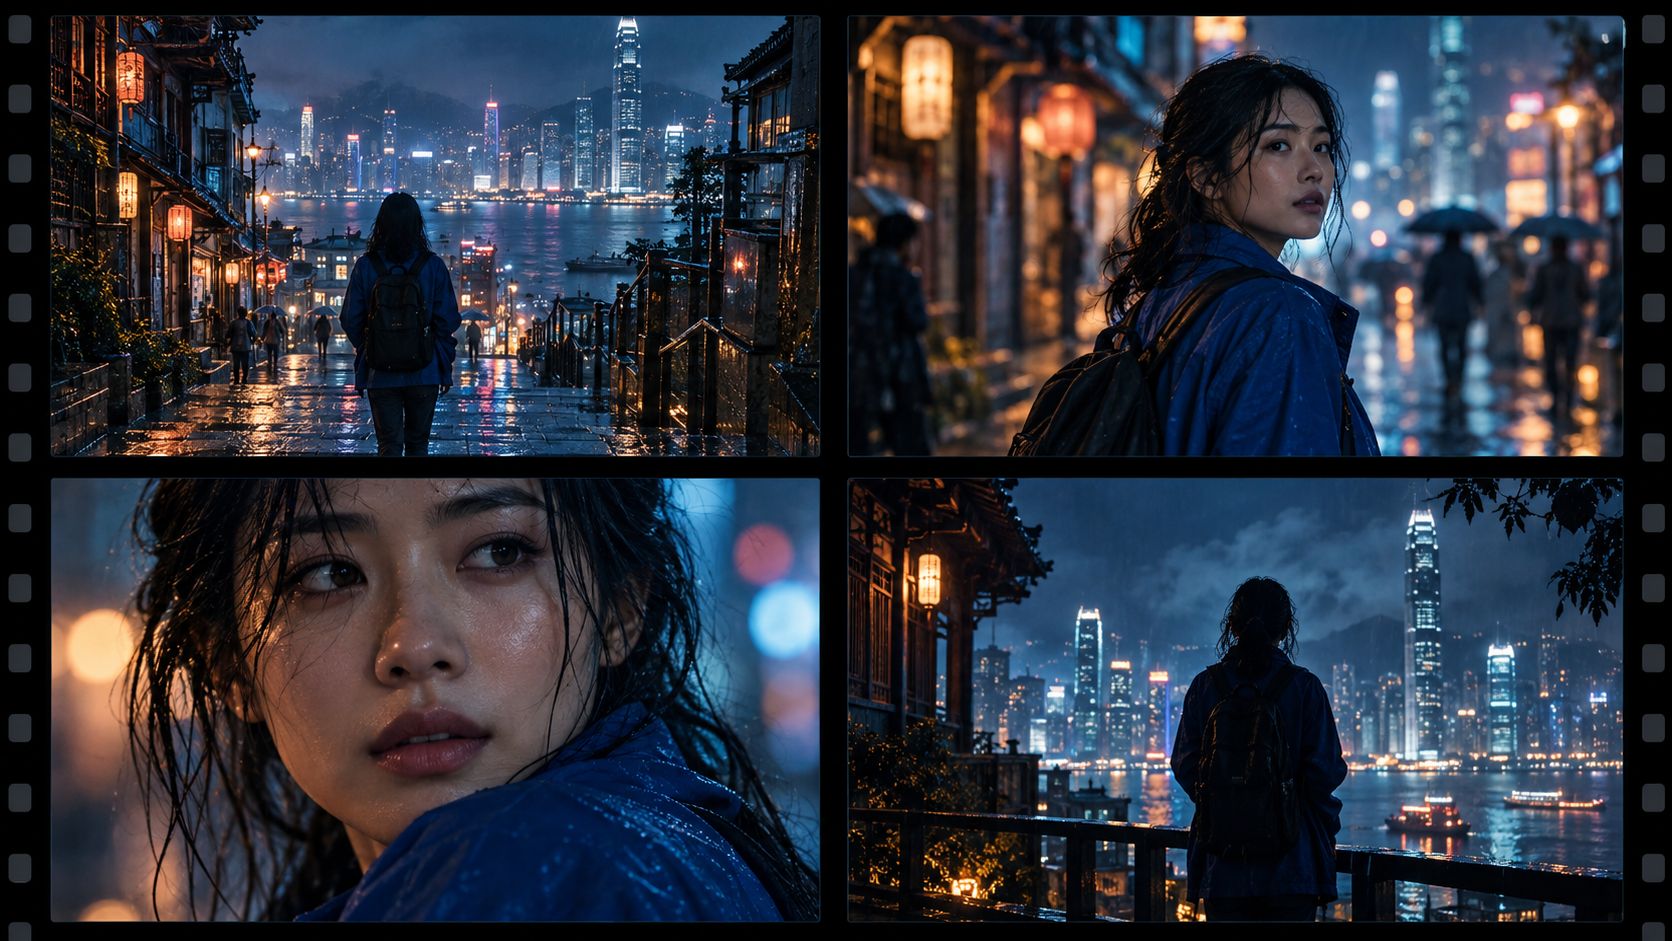
An AI video storyboard prompt should describe one shot, not an entire film. Give that shot one narrative job, one visible subject action, one camera behavior, a clear starting composition, and a clean exit. Then carry a short continuity block into the next prompt. This turns prompting from a search for one lucky clip into a sequence you can direct, compare, and cut.
If you already have a planned first frame, open the China Video AI image-to-video workspace. Select the model that matches your control needs, then test the shortest useful shot before spending on a longer version. If you are still shaping the idea, begin at the China Video AI homepage and choose the workflow after you know whether each card starts from text, an image, or a motion reference.
The short answer: write a sequence of small contracts
A useful storyboard is a set of small production contracts. Each card says what the audience learns, what must remain stable, what is allowed to move, and where the shot should hand off to the next one. The prose can be vivid, but the structure should be boringly clear.
Use this order:
Shot role -> starting frame -> subject action -> camera behavior
-> continuity anchors -> light and texture -> duration -> exit frame
That order prevents a familiar failure: a beautiful prompt that contains three locations, four camera moves, a wardrobe change, a time jump, and a complete plot. A video model then has to choose which instruction matters. Your editor receives motion, but not necessarily the motion the cut needs.
The storyboard also gives you a fair basis for model comparison. China Video AI currently exposes several video model families, including Seedance 2.5, Seedance 2, Kling 3, and MiniMax H3. Their options and strengths differ. A locked shot brief lets you compare their treatment of the same task instead of changing the model and creative direction at the same time.
1. Start with the change, not the visuals
Before choosing lenses or lighting, write one sentence that explains the sequence change. For a product film, it might be: “A neglected bicycle becomes the reason someone leaves the house.” For a character beat: “A traveler arrives anxious and leaves certain.” For a tutorial: “A blank frame becomes a finished motion poster.”
That sentence is not the generation prompt. It is the editing promise. Every shot must either establish the starting condition, move the change forward, reveal the payoff, or create a necessary bridge. If a card does none of those jobs, remove it.
Here is a compact six-card spine:
1. Context: where are we, and what is missing?
2. Approach: who or what enters the situation?
3. Detail: which object, gesture, or clue matters?
4. Action: what irreversible movement happens?
5. Payoff: what changed emotionally or practically?
6. End frame: where can the edit, title, or loop breathe?
This is not a compulsory formula. A six-second social clip may need only setup, action, and payoff. A thirty-second demonstration may need two detail shots. The rule is functional: every cut should change information, scale, rhythm, or feeling.
2. Give every storyboard card one job
Shot roles are more useful than shot numbers. “Shot 4” tells a model nothing. “Detail that proves the bicycle has been repaired” tells the writer, generator, and editor why the image exists.
Write the role above each card before the prompt. Common roles include establishing context, introducing a subject, revealing a clue, demonstrating an action, showing a reaction, confirming a result, hiding a transition, and creating a loop point. Two adjacent cards with the same role are often candidates for consolidation.
A card can still be cinematic. It simply needs a priority. If the role is “reaction,” the face and gaze matter more than a complicated orbiting camera. If the role is “proof,” the product detail must be readable and stable. If the role is “transition,” matching screen direction may matter more than perfect facial detail.
3. Build a continuity block once
Multi-shot continuity is difficult because every generation is a new inference. Do not ask prose memory to do all the work. Write a reusable continuity block and keep it identical until you intentionally change the scene.
CONTINUITY BLOCK
Subject: woman in her early thirties, short black bob, cobalt rain jacket,
black canvas backpack with one silver buckle
Location: steep old-city street above a harbor, wet stone, paper lanterns
Time and light: blue hour after rain, warm lantern practicals, cool skyline
Palette: navy, cyan reflections, small amber highlights
Screen direction: subject travels left to right
Lens language: restrained 35 mm and 50 mm look, natural perspective
Texture: realistic rain, controlled highlights, no dreamy haze
The block should identify only features you can judge. “Beautiful,” “cinematic,” and “premium” are preferences, not continuity anchors. A cobalt jacket, silver buckle, wet stone street, left-to-right travel, and blue-hour light can be checked frame by frame.
If your model supports image references, pair this text block with the same approved identity still, product still, or previous end frame. The Seedance 2.5 reference-to-video guide explains how to give each reference one job instead of flooding the request with competing materials.
4. Describe the starting composition before motion
Models often drift when a prompt begins with motion but never establishes what the first frame contains. Start with the shot size, subject position, visible environment, and any important foreground layer.
Compare these two instructions:
Weak: She walks through a rainy street as the camera moves cinematically.

Directed: Medium-wide profile. The woman begins on the left third beneath
a warm lantern; the harbor skyline stays visible in the upper-right distance.
She walks left to right for three steps. The camera tracks laterally at her
pace without changing distance. End as she turns her head toward the harbor.
The directed version creates a visible start, one subject action, one camera action, and an exit condition. It also protects editability. The next card can begin on the head turn or cut to what she sees.
When using image-to-video, the uploaded frame already supplies much of the composition, color, lighting, and subject appearance. In that case, spend prompt space on motion and camera behavior rather than restating every pixel. Make sure the requested move is compatible with the image. A tight face crop cannot honestly produce a clean full-body running shot without inventing most of the body and location.
5. Separate subject motion from camera motion
“Dynamic movement” is ambiguous. The subject, the camera, the environment, or all three might move. Name them separately.
SUBJECT: The rider places one hand on the saddle and swings the right leg
over the bicycle in one smooth action.

CAMERA: Locked medium-wide frame at waist height. No pan, tilt, zoom, or orbit.

ENVIRONMENT: Olive leaves move lightly in the breeze; the courtyard remains
stable; no pedestrians enter.
For a diagnostic generation, allow one dominant motion source. A moving subject with a locked camera is easier to evaluate than a moving subject inside a whip pan while leaves, fabric, reflections, and background crowds all compete for temporal attention.
Once the action works, add one camera move. “Slow dolly in” and “zoom in” are not interchangeable. A dolly changes perspective as the camera moves through space. A zoom changes field of view from a fixed position. If the difference matters to the cut, state the physical behavior and check the result rather than assuming the verb was obeyed.
6. Use duration as an editing constraint
Duration is not empty space the model should fill. It controls how much action can read. Break each card into beats that fit the selected clip length.
5-SECOND SHOT
0.0-1.0s: hold the established bicycle and courtyard
1.0-3.5s: hand enters, grips saddle, and lifts it slightly
3.5-5.0s: settle on the red rear reflector for the cut
Do not force a five-beat performance into a four-second clip. Either simplify the action or split it across cards. Give important movements a brief hold before and after. Those stable handles help the editor cut and give the viewer time to recognize what changed.
Treat stated timings as intent, not frame-accurate guarantees. Review the actual result. If the action completes too early, shorten the pre-roll. If the model invents a second action, make the exit condition more explicit and remove ornamental motion words.
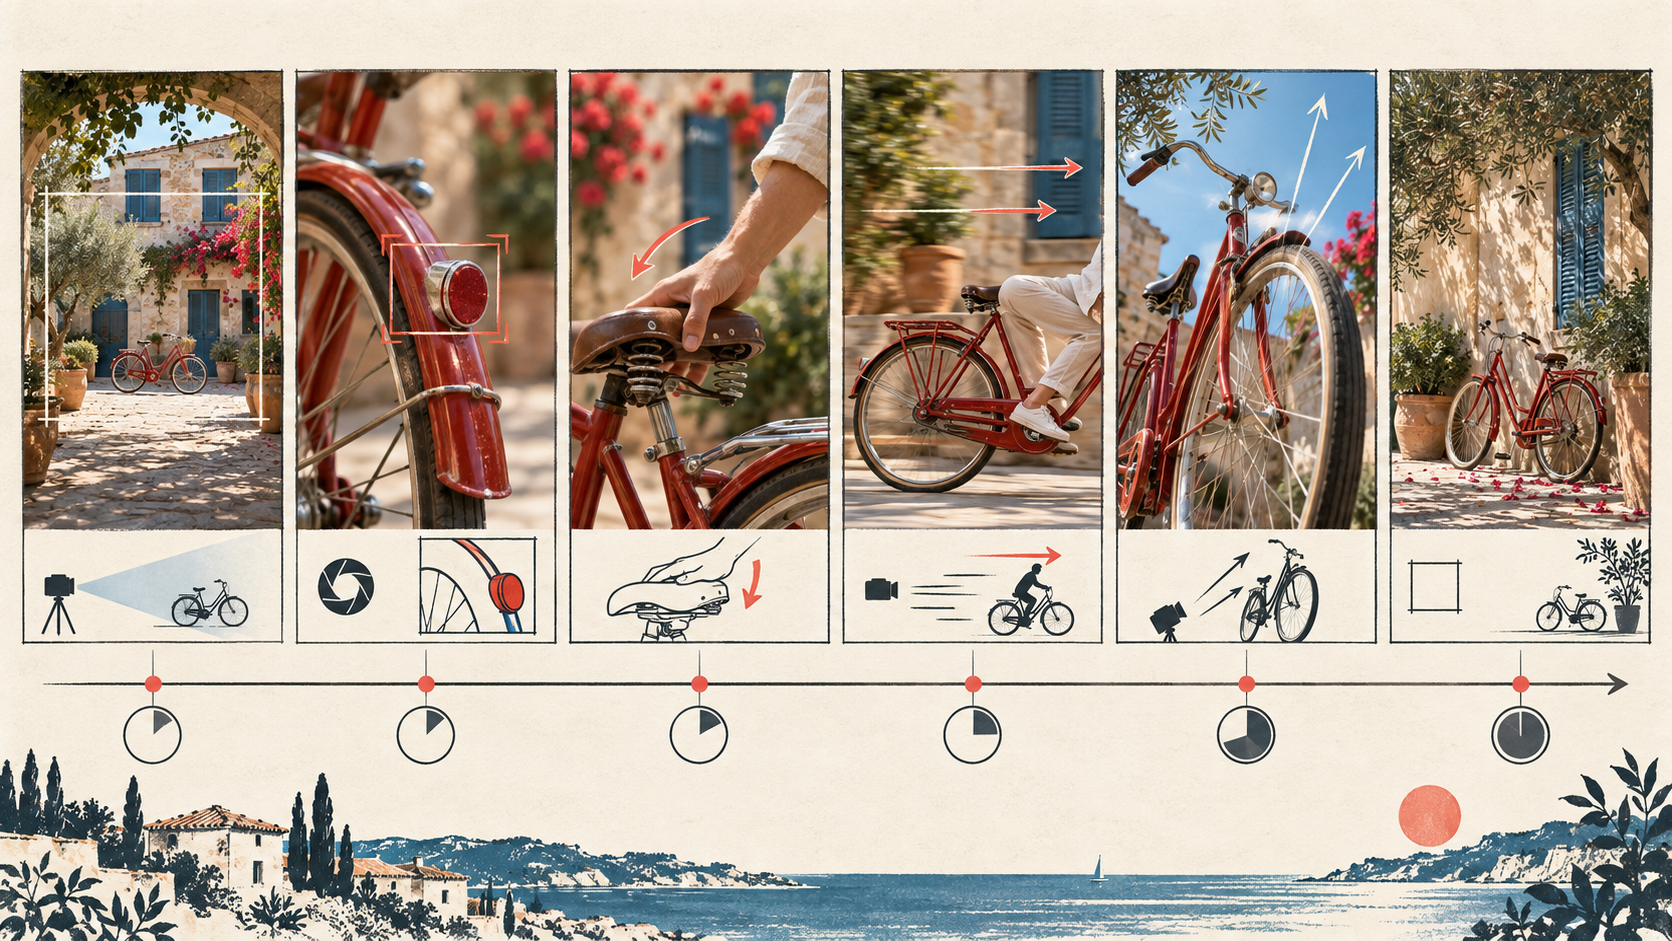
7. Write prompts that connect at the cut
Two individually strong clips can fail as a sequence. Plan the relationship between the exit frame of one shot and the opening frame of the next.
The easiest bridges are action, gaze, position, shape, color, and sound. A hand reaches for a red reflector, then the next shot opens on the reflector. A character turns right, then the next view reveals what sits to the right. A circular wheel fills the frame, then a circular sun begins the next shot. These connections give the cut a reason.
Add a handoff line to each card:
EXIT: The red rear reflector fills the center-right of frame and holds steady.
NEXT OPEN: Extreme close-up of the same reflector in the same warm sunlight;
the hand wipes dust from left to right.
If you plan to use a generated last frame as the next image reference, choose a frame without motion blur, half-closed eyes, hidden hands, or unstable geometry. Continuity improves when the anchor itself is clean.
8. A complete six-shot prompt set
Here is a reusable sequence for the bicycle story. Keep the continuity block above each prompt in your working document, even when you omit it from this compact view.
Shot A: establish the untouched object
Role: context. Wide static frame of a quiet Mediterranean courtyard in late
morning. The same red vintage bicycle rests beneath an olive tree on the left
third. Blue shutters and pale stone form a stable background. Leaves move
slightly; the bicycle stays still. Hold the final second with open space on the
right for the character to enter.
Shot B: reveal the meaningful detail
Role: clue. Macro close-up of the same red rear reflector and chrome fender.
A fingertip wipes a narrow line through the dust from left to right. Locked
camera, shallow but stable focus, warm sun edge, no change to bicycle geometry.
End with the clean reflector centered and still.
Shot C: turn inspection into action
Role: action. Medium side view. The same person in an oatmeal linen shirt grips
the saddle and raises it once to test the spring. Camera remains locked at waist
height. One clean hand action, subtle leaf movement, no extra tools or people.
End after the saddle settles back into place.
Shot D: create forward momentum
Role: movement. Medium-wide lateral tracking shot of the same red bicycle moving
left to right across the same courtyard. The rider pedals at an easy pace. Camera
matches speed and distance; background parallax remains natural. No zoom, no
orbit, no change of wardrobe. End as the front wheel crosses the right third.
Shot E: deliver the payoff
Role: payoff. Low-angle three-quarter hero view as the bicycle rolls into a sunlit
archway. One gentle tilt up follows the handlebars toward open blue sky. Preserve
the exact red frame, chrome fenders, brown saddle, and rider wardrobe. The feeling
is release, not speed. Let the motion finish before the cut.
Shot F: give the sequence a quiet end
Role: end frame. Return to the original wide courtyard composition near sunset.
The bicycle now rests beside the opposite wall, still facing right. Long olive
shadows move slightly. Locked camera, no people. Hold a clean final two seconds
for a title, sound tail, or seamless loop.
The sequence does not depend on the bicycle. Replace the object and location while preserving the role logic. Context lets us orient. Detail creates importance. Interaction begins change. Movement proves it. A hero view delivers emotion. The end frame lets the audience absorb the result.
9. Choose a model after you define the control problem
Do not start a storyboard meeting with a model name. Start with the control problem. Do you have a strong first frame? Use image-to-video. Do you need motion copied from a driving clip? Use a compatible video-to-video or reference workflow. Do you need the model to invent the entire composition? Text-to-video may be the right first pass, but identity and layout will need extra review.
In China Video AI, open the image-to-video workspace for frame-led shots. This link preselects Seedance 2.5, while the interface also offers options such as Seedance 2, Kling 3, and MiniMax H3 where their mode support applies. Keep prompt, reference, duration, aspect ratio, and review criteria fixed for a fair comparison.
For product sequences, the one-image product ad guide shows how to turn a clean product reference into a small set of reveal and payoff shots. Its key lesson carries over: fix the shot description before switching models, then compare one controlled task.
10. Review continuity with a five-pass cut
Do not approve clips in isolation. Put them in sequence, even as a rough timeline, and review five passes.
First, watch identity with sound off. Check face, hair, wardrobe, object shape, and distinctive marks. Second, watch geography. Track screen direction, eyelines, subject position, and the implied location. Third, watch motion. Look for speed jumps, frozen background elements, foot sliding, unwanted zoom, and actions that restart at cuts. Fourth, watch light and color. A sudden time-of-day change can feel like a story event even when it was accidental. Fifth, watch information and emotion. Confirm that each shot adds something.
Use a small ledger:
Shot | Role | Pass/Fail | First bad frame | One next change
A    | Context | PASS | - | Lock as reference
B    | Clue    | FAIL | 02:14 | Remove camera push-in
C    | Action  | FAIL | 01:22 | Use clearer hand position
D    | Motion  | PASS | - | Keep seed and framing
The “one next change” column matters. If a shot fails identity and camera motion, fix the earlier or more destructive problem first. Multiple simultaneous changes destroy the evidence produced by a retry.
Use the clip above as a review exercise, not as a claim about a particular model. Pause at several moments and inspect subject identity, framing, motion direction, temporal artifacts, and the usefulness of the opening and closing handles. The editorial question is not “Is this impressive?” It is “Can this shot do its assigned job in the cut?”
11. Diagnose failures without rewriting everything
When a storyboard shot fails, classify it before prompting again.
- If identity changes, simplify the subject description, strengthen the approved image anchor, and reduce camera or body motion.
- If composition drifts, define the first frame more clearly and remove competing camera verbs.
- If motion feels weak, make the action visible and physically specific rather than adding emotional adjectives.
- If the cut does not connect, rewrite the exit condition and next opening as a pair.
- If the scene changes, repeat the concrete location and lighting anchors verbatim.
- If the clip is busy, freeze the camera or environment and keep one dominant motion.
The goal is not to make every first generation usable. The goal is to make each failure legible enough to produce a better second decision. A disciplined storyboard saves credits because it limits the size of each question.
12. Final production checklist
Before generating, confirm that the sequence promise fits in one sentence and every card has one role. Confirm that the same continuity block appears wherever the subject or object must remain stable. Each prompt should name a starting composition, one primary action, one camera behavior, a feasible duration, and a useful exit frame.
Before editing, confirm that you have clean opening and closing handles. Check identity, geography, motion, light, and information in separate passes. Keep the last known-good clip and record one next change for every failed card.
When you are ready to test, open the China Video AI image-to-video workspace, choose the appropriate model in the interface, and generate the cheapest useful version of Shot A. Return to the homepage if another workflow better matches your source material. Continue with the Seedance 2.5 reference guide when your sequence needs multiple reference types, or use the one-image product ad workflow when the product itself is the continuity anchor.
Your first storyboard does not need to predict every frame. It needs to make the next decision obvious. Give each shot a job, preserve what the audience must recognize, and let the cut carry the story.